Friday 30 March 2018

Make Felt Fondant Fancies!

UPDATE: my felt fondant fancy pincushion tutorial is now available via Patreon. 

Subscribe to get instant access to a growing library of PDF embroidery patterns and craft tutorials, and updates when I add something new!

---

Every month this year I'm sharing a free pattern with my newsletter subscribers, and April's project is all about cake!


April's tutorial will show you how to sew a felt fondant fancy to use as pincushion, display with your favourite vintage china, or give as a quirky gift to a friend with a sweet tooth.

https://tinyletter.com/bugsandfishes

I send out my free email newsletter about once a week, with updates of what I've been making and doing lately and links to my latest blog posts and tutorials and lots of creative and colourful things to inspire you.

Every email I send in April will include a link to download the step-by-step felt fancies pattern.

https://tinyletter.com/bugsandfishes

Click here to subscribe!

UPDATE: My newsletter has moved! Click here to sign up and see this month's free pattern.


P.S. Want some more teatime-inspired tutorials? Click here to make felt jammy biscuit brooches, and click here to make felt iced biscuit brooches

Wednesday 28 March 2018

The 100 Day Project 2018: 100 Days of Felt Food

This year's #The100DayProject begins on Tuesday, April 3rd - are you joining in?

The idea of the project is that you pick a creative action, do it every day for a hundred days, and share your progress on Instagram (or elsewhere online) via the main project hashtag and using a unique hashtag for your own project to collect all your pics together.

100 doodles! 100 portraits of cats! 100 photos of flowers! 100 embroidery stitches! 100 paintings of Brutalist architecture! 100 days of potato printing! Small or large, quick or time-consuming, relaxing or challenging, you choose what works for you.

Last year I decided (on a whim and very much at the last minute) to join in for the first time with #100DaysofFeltStuff... and lasted less than a fortnight. It was an amazing thing to be part of, though. I connected with so many awesome makers, learned some really important lessons about my perfectionist tendencies (frustrated tears were shed!) and the pieces I stitched ended up being some of my favourite work that year. 

So, I'm trying again this year with the slightly more focused #100DaysofFeltFood.

https://www.instagram.com/explore/tags/100daysoffeltfood/

I've had fun making felt food in the past (including these felt fruit tutorials and last year's felt Jaffa Cake), and I feel like this topic will give me lots of variety without hitting that "oh gosh I could make anything but what???" panic which I suffered quite a bit of last year.
 
I'm hoping with a bit of planning, I can flex my creative muscles without tearing my hair out and make it all the way through the 100 days this time. Fingers crossed!

I'll be sharing daily photos on my Instagram Stories, and posting updates in my main Instagram feed - as well as on Facebook, Twitter and here on my blog. So if you're keen to see what I'm making but don't use Instagram don't worry, you won't be out of the loop.

UPDATE: It looks like the direct links to my hashtagged 100 Day Project pictures aren't working if you're not logged into Instagram, which is rather annoying. If you don't have an Instagram account you'll still be able to follow along with my new project by browsing my main feed here, and you can see most of my designs from last year here.

Monday 26 March 2018

A Walk in the Snow

It snowed here last week, which was annoying (because, hello, where is Spring? I want it to be Spring, please!) but also rather gorgeous.

I popped out to take "a few photos" and ended up going for a three and a half hour walk, taking rather more than a few photos along the way...

The beach itself wasn't covered in snow (unlike earlier in the month when the Beast from the East brought us LOTS of snow and a blast of very cold temperatures), but enough had settled on the benches and fences and bushes along the beach to make everything very picturesque.


I love the lines of snow clinging to these poles...


... and how the sand dunes looked like iced gingerbread.


There's a steep footpath that leads up from the beach and down through the golf course on the other side. I couldn't resist walking up it to take a peek at the snow-covered course.


Can you spot the Old Church of St Nicholas on the hill in the distance?


Then I carefully clambered back down the path (to the great fascination of a passing dog which was amazed that a person had magically just appeared on the beach) and walked further up the beach and down Beach Road towards Uphill village and the boatyard.


The road should have been closed that day for the local half marathon, but the organisers had taken the sensible decision to cancel due to the weather!


My winter shoes were lovely and cosy, but I wish I'd brought wellingtons so I could have braved the muddy paths around the boatyard. I went this far and no further, retracing my steps back to the road.


Uphill hill was looking almost other-worldly in the snow, a bleak but beautiful landscape of white and brown and grey.


I followed the path up through the nature reserve, past groups of kids on sledges and people out walking their dogs (both dogs and people wrapped up warm against the cold).

I love how transformative snow is - making the ordinary extraordinary, at once concealing and revealing.


After all that walking (and taking my gloves on and off so I could take photos with my smartphone) it was definitely time for a cup of hot chocolate at the boatyard cafe (yum) then to head home and get warm!

Friday 23 March 2018

Make Felt Chicken & Egg Ornaments for Easter

Sew some cute felt chicken and egg ornaments for Easter or Spring with my latest tutorial for the Village Haberdashery!

Felt Easter Chicken & Egg Ornaments Tutorial
 
These fun felt ornaments are easy to sew and would look lovely hung on an Easter tree, or elsewhere in your home this Spring. You could also use the templates to make fun felt chicken brooches.

 Felt Chicken & Egg Easter Ornaments

I stitched my ornaments in classic Easter pastels, using wool blend felt from the Village Haberdashery's range. Switch up the colours to match your decor, or add extra embellishments with embroidery thread, sequins or seed beads. 

 Set of three cute felt chicken & egg ornaments

Click here for the free templates and step by step tutorial.

Subscribe to my newsletter for a monthly free pattern and visit my crafty tutorial archive for lots more free projects.

Wednesday 21 March 2018

Kew Gardens in March: the Orchids Festival (and a Very Lucky Lizard)

Sitting down to write this blog post I've realised how terribly timed it is - here I am blogging about the annual Orchids Festival at Kew Gardens when this year's festival has literally just finished and you'll have to wait a whole year to see it for yourself. I am a bad, mean blogger and I apologise.

Hopefully enough of the sheer joy of the TROPICAL COLOUR EXPLOSION that is the Orchid Festival will seep out of these photos for you to enjoy in the meantime!


The annual festival runs from mid-February to mid-March in Kew's Princess of Wales Conservatory and is a wonderful burst of warmth and colour. I visited in 2015 (regular readers will know I'm sloooowly blogging about my year's membership of the gardens in 2015, which is one of the best things I think I've ever spent money on) and absolutely adored it.


The Conservatory is already a gorgeous space to explore, but the addition of the orchid-filled displays is the icing on the botanical cake.


I got a peek at the preparations for the festival when I visited the gardens in January, but I was entirely unprepared for the sheer volume and variety of the orchids that would be on display.

I don't even like orchids that much (I don't dislike them, don't get me wrong, they're just nowhere near being my fave flower or my top choice for a houseplant) but en masse like this they made my heart positively sing.


You can learn all about orchids and their habitats at the festival, of course. Kew is never short of opportunities to learn some fascinating plant facts. But I mostly just wandered about gazing at the displays, trying not to repeatedly say "wow" out loud or let my jaw drop open in front of passing strangers.


All that and I encountered one of the Conservatory's resident pest controllers - a very chilled out Chinese Water Dragon who wandered across one of the paths to everyone's great delight. I'm not sure if lizards care about orchids (I'm guessing probably not), but a massive glass house has got to be a pretty great space for a lizard to live!


More Kew adventures soon!

You'll find all my Kew posts here, and you can read about all of my travels in the UK here.

You might also enjoy reading about my visit to the Camellia Festival at Chiswick House & Gardens. 

Monday 19 March 2018

My Flat in Progress: February 2017

If you've been reading my blog for a while you might remember that I moved to the seaside about a year ago and bought a flat. It was a big change, and an exciting one!

I'm living walking distance from the beach, which is amazing - I've been on so many walks since moving here and have started actively pining for the sea if I'm away from it for too long. My flat is a bit of a fixer-upper, though, and we (myself, with lots of help from my parents) have lots of projects to do to get it looking at its best.

We had a busy few weeks after I first moved in, cleaning everything, buying loads of important stuff like lightbulbs and a fridge and a new loo seat, and making a start on the decorating and DIY. Click here to see what we got up to!

February continued to be pretty DIY-focused and slightly chaotic. I was living out of boxes, with everything piled up in a corner of my bedroom next to two single beds (one for me, one for whichever of my parents was visiting that week), while we worked on the living room and spare bedroom.

Every time my parents came to visit, they brought me a few more boxes of my stuff (which was mostly still in storage at their house) or a bit of furniture. Moving in gradually like this meant I didn't have to spend money on a moving van, but also meant we had plenty of space to work on the messy DIY without worrying about where to put everything.


Juggling my creative business and my home renovation project was tricky at times and led to some interesting photo set-ups! (If you're curious, you can see the photos I was taking here and here).


This is one of the ways I was really lucky to have my parents helping me out - I'd put in some hours working towards a deadline, then join them in whatever bit of DIY we were working on that day. Together we moved everything forwards much, much quicker than I would have done on my own even if I had the skills to work solo on this stuff (which I do not). 

February was all about the walls.

The walls in the spare room were like the surface of the moon, lumps and craters everywhere, which took a lot of hours of filling and sanding to get looking smooth (god bless my dad and all the dust-covered hours he put in with the sander).

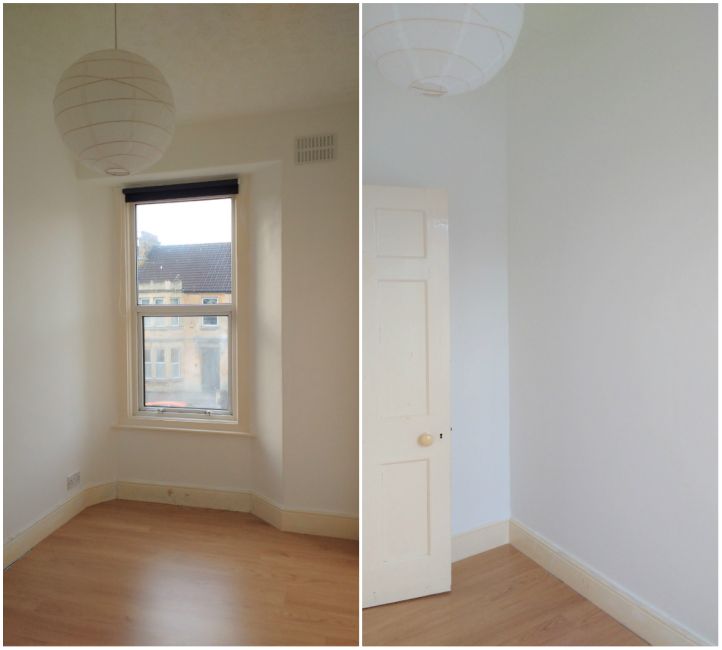
The spare room went from looking like this (on the left is how it looked when I moved in, on the right how it looked mid-filling)...


... to this. New light shade, freshly painted white walls, and new new wall vent (the new vent we'd fitted in January turning out not to be sturdy enough for the strong winds we get here on the coast!). Still lots to get done, but "finished" enough to serve as an actual bedroom for my first official houseguest!


We also filled and sanded bits of the living room walls, and my dad did a bit of replastering.

Was it fun discovering patches of the wall that needed replastering? It was not. Did it give me anxiety looking at this corner of my living room when it looked like that? It absolutely did.


It was a great relief getting everything patched up neatly!!


After I'd photographed those rather fabulous paint layers, of course.


As well as sanding, filling, replastering and painting assorted walls, we started prepping the window frames in the lounge (more filling and sanding)...


 ... and (after much online browsing and umming and ahhhing about prices and features) I bought some new appliances: a vacuum cleaner (I'd been borrowing my parents' hoover before then), and a washing machine. I was so excited about the washing machine I took a photo of the ceremonial first wash, haha.


As you can see, we patched up the underside of the kitchen counter a bit before installing the washing machine. The cabinets in my kitchen are not in great condition and are so musty that I'm not actually using them. I have a couple of shelving units standing in a corner instead, and the rest of my kitchen stuff packed up in crates.

It's not ideal, but - just like camping dormitory style surrounded by boxes, and doing photoshoots on a dustsheet amidst DIY chaos - it's only temporary and will be totally worth it in the long run!

More flat updates coming soon...